Page 12 - TDM - 1st Year - TT - Hindi
P. 12
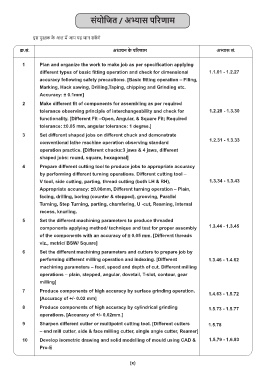
संयोिजत / अ ास प रणाम


               इस पु क के  अ  म  आप यह जान सक  गे


           .सं.                                  अ यन के  प रणाम                             अ ास सं.


           1      Plan and organize the work to make job as per specification applying
                  different types of basic fitting operation and check for dimensional      1.1.01 - 1.2.27
                  accuracy following safety precautions. [Basic fitting operation – Filing,
                  Marking, Hack sawing, Drilling,Taping, chipping and Grinding etc.
                  Accuracy: ± 0.1mm]

           2      Make different fit of components for assembling as per required
                  tolerance observing principle of interchangeability and check for       1.2.28 - 1.3.30
                  functionality. [Different Fit –Open, Angular, & Square Fit; Required
                  tolerance: ±0.05 mm, angular tolerance: 1 degree.]
           3      Set different shaped jobs on different chuck and demonstrate
                                                                                          1.2.31 - 1.3.33
                  conventional lathe machine operation observing standard
                  operation practice. [Different chucks:3 jaws & 4 jaws, different
                  shaped jobs: round, square, hexagonal]

           4      Prepare different cutting tool to produce jobs to appropriate accuracy
                  by performing different turning operations. Different cutting tool –
                  V tool, side cutting, parting, thread cutting (both LH & RH),           1.3.34 - 1.3.43
                  Appropriate accuracy: ±0.06mm, Different turning operation – Plain,
                  facing, drilling, boring (counter & stepped), grooving, Parallel
                  Turning, Step Turning, parting, chamfering, U -cut, Reaming, internal
                  recess, knurling.
           5      Set the different machining parameters to produce threaded
                  components applying method/ technique and test for proper assembly      1.3.44 - 1.3.45
                  of the components with an accuracy of ± 0.05 mm. [Different threads
                  viz., metric/ BSW/ Square]
           6      Set the different machining parameters and cutters to prepare job by
                  performing different milling operation and indexing. [Different           1.3.46 - 1.4.62
                  machining parameters – feed, speed and depth of cut. Different milling
                  operations – plain, stepped, angular, dovetail, T-slot, contour, gear
                  milling]

           7      Produce components of high accuracy by surface grinding operation.
                                                                                          1.4.63 - 1.5.72
                  [Accuracy of +/- 0.02 mm]
           8      Produce components of high accuracy by cylindrical grinding             1.5.73 - 1.5.77
                  operations. [Accuracy of +/- 0.02mm.]
           9      Sharpen different cutter or multipoint cutting tool. [Different cutters   1.5.78
                  – end mill cutter, side & face milling cutter, single angle cutter, Reamer]

           10     Develop isometric drawing and solid modelling of mould using CAD &      1.5.79 - 1.6.83
                  Pro-E


                                                        (x)

